Showing posts with label 1940s. Show all posts

Tuesday, 7 May 2013

Curls in Crisis

Now all my wedding sewing is finished, I've had more time to work on fun projects, but I've been too lazy to take any photos. The weather is looking good for the next few days so I hope to have a sewing post for you in the near future. For now, let's talk hair.

While I'm reasonably confident in setting my own hair, I really wanted someone else to style it for my wedding. You know how it goes - get pampered and preened by others and not have to worry about a thing. Originally, I'd wanted my hair to look something like this...

 
But, after the hair trial, it was apparent my layers were still too short to create a nice, smooth wave and my hairdresser wasn't up to the task of finger-waves. It was time for a rethink. I decided to go with something based on the '30s Fake Bob' which appears in Lauren Rennell's awesome Vintage Hairstyling book (p73). Sadly, the hairdresser's interpretation of the style wasn't quite what I was looking for,and with the day being so hot my curls had dropped in the 5 minutes it took to drive home. 
 
Photo: Indie Lane.
 
Thankfully, I have a large stash of pin curl clips and was able to rearrange the disaster into something resembling the hair-do I had envisioned. I also had the help of Kusco Murphy Setting Lotion to keep my curls in shape. It has really good holding power and the smell reminds me of something my Nanna used to use in my hair as a child. Does anyone remember Curly Pet?

Photo: Indie Lane.

With the clock ticking, I had less than an hour to allow my curls to set so I decided to leave them fully formed. Ordinarily, I would have liked to have brushed them out for a softer look, but I couldn't risk them dropping again. With some carefully placed bobby pins and a generous helping of hairspray, those babies were not going anywhere.


Crisis averted!
Photo: Indie Lane.

As you can see, the 'do is a long way from Kate Bosworth's sweeping wave but it's still got that vintage bride style. Oh, and I'm pleased to report, my curls lasted well into the wee hours.

- Tamara 


Thursday, 25 April 2013

The Devil's in the Detail

As I mentioned in my last post, it was far from smooth sailing with the construction of my wedding dress. 

Regardless of whether I'm using a vintage or modern pattern, I always need to take an inch out of the bodice length. Ordinarily, the 'shorten/lengthen' line is marked on the tissue, but due to the Empire style bust line there's no allowance for it. To remedy the problem, I took an inch from the top of the skirt to bring the curve of the side seam up to my hip line, where it should be.

With this adjustment made, I set about making a muslin to check the fit. I'd purchased some crazy cheap silk satin from Thailand for the job and boy, could you tell it was cheap. You could hear the needle sawing through the fabric and it felt like I was sewing two pieces of paper together! Ugh!


As you can see, the waistline is in the right place but the cowl is outta control! If I was going to wear this version, I'd be flashing my boobs all day; not to mention the amount of food that would find its way in there. I had no idea where to start in order to fix the excess fabric in the cowl and was so peeved with it, I threw the muslin on the ground and stomped all over it in disgust.
 
Several days later, after I'd had a chance to calm down, I took a second look. From what I could tell, I would need to remove at least an inch and a half from the cowl piece itself. With limited pattern making skills at my disposal, I decided to wing it and take out an up-side down triangular piece, starting at the mid-point of the bust. I had to make another two versions of the bodice from an old sheet before the cowl had just the right amount of fall. I didn't take any photos of the progress but here's the final result...


I hadn't really planned on adding any extra embellishments to the dress, other than the pearl strands, but when I came across a trim made up of beaded fans with tulle in Tessutti, I knew it wouldn't be complete without them. After carefully separating each fan, then reinforcing the edges so they wouldn't fall apart, they were sewn on by hand using invisible thread. What a pain in the butt that stuff is to use.


Behold the beauty that is my crazy, long train.
The hem took a good seven hours to sew!
 
Photo: Indie Lane
For some reason, the elasticised continuous loop trim is difficult to source these days so I had to make my own button loops. There should have been twenty buttons down the back of the dress, but I had terrible trouble getting them in quantity. After much trial & error with nail polish and various types of buttons, I just had to go with less buttons - I was only able to find fifteen.


Photo: Terry Hartin
Despite the fitting issues, not to mention the bruised elbows caused by hours of hand sewing, my perfect wedding dress was well worth the effort. 
 
 
- Tamara

Monday, 15 April 2013

Bye, Bye Belle

I know I said I'd be posting my news at the end of February, but life sometimes gets in the way and I've not had much spare time of the last couple of months. I've also had some frustrating issues with my computer (time for an upgrade), but that's another story.

Here's what I've been up to...


Photo: Terry Hartin.
I'm a Mrs.!
 
Mdblm & I met online (dating) and things were easy from the start. Our first date, we spent six hours together and we were never once lost for conversation. I also remember we laughed a whole lot too. He ticked all my wish-list items, bar one - he's not much of a dancer but we've been working on that - and he's the most awesomely supportive guy I've ever met!
 
That said, this being a sewing blog an' all, let's get on to the dress.
 
 
Simplicity Retro - Costume Collection 4566


I'd always thought is weird this pattern was filed under the 'Costume' section of the Simplicity pattern book; it's so beautiful and not at all costume-y. As soon as I saw it, I knew (someday) this would be my wedding dress. That was nearly six years ago now and although my sewing skills have vastly improved, I'd never undertaken such a large project. It was intimidating to say the least.
 
Thankfully, once the skirt part of the dress is sewn - it has French seams - it's two-thirds done. I did have some fitting issues with the bodice, there's no allowance to adjust the length, but I persisted, documenting every change as I went. It may have taken me three months, and several muslins to get it right, but it was well worth the effort.
 
 
Photo: Terry Hartin.
 
So there you have it! I think it's a pretty reasonable excuse for being a bit of an absent blogger these last few months. Although my life has become a lot busier of late, I hope to be back in the next day or two with more divine dress details.
 
- Tamara


Tuesday, 16 October 2012

Be a Saver, not a Spender

As I mentioned yesterday, there weren't enough sewing related stalls at the Love Vintage Summer Show for my liking but, surprise, surprise, I still managed to buy something.
Australian Home Journal, April 1st, 1946.

The seller I purchased this April 1946 edition of the Australian Home Journal from had loads of these for sale - in varying condition and she even had multiple copies, which is almost unheard of. They all came complete with their patterns but were sealed so you couldn't get a look at the condition inside.
 
Ordinarily, I don't like to spend more than $10 on these magazines, especially if I don't get the chance to woman-handle it first, so $18 for this one was a bit excessive. But look at that dress on the left! Would you have been able to resist?
 
While the quality of the inside pages left a lot to be desired, I did happen upon a couple of lovely knitting patterns and adverts I'd like to share with you guys. 


Even though the weather here is on the improve,
I want one of these two-tone jumpers!
It's so freakin' cute!!
 
 
This is the rest of the instructions for both the blouse and jumper
should anyone out there want to knit one up.


Oh, and before I forget, this was what I wore to the Show (sans hat).
 My all time favourite dress; a Madeleine Faith design from Saks Fifth Avenue.
It cost me a small fortune but it was well worth it, it fits like it was made for me.
 
 
¡ QuĂ© belleza!
 
- Tamara


Tuesday, 18 September 2012

Chou Business

After all the fiddly-ness of my recent sewing projects, I decided it was time make something simple, something I could (hopefully) whip up in a day or two. My shoulder injury is also limiting the amount of time I can spend at the sewing machine so it couldn't have too much detail. It's so frustrating to only be able to sew a seam or two before needing a couple of hours break!

As you well know, I'm a huge fan of the early Vogue patterns and this adorable blouse has been on my wish list for some time - A 1940s button back blouse with a lovely soft Chou neckline.

Vogue 6422
Looks simple enough, right? There are only two main pieces needed for the blouse- the rest are facings, etc - and judging by the line drawings on the back of the envelope, it was going to be easy-peasy. Oh, how wrong I was! When I pulled out the pattern pieces and studied the markings, I very nearly burst into tears.
 
Here's why...

 
Just look at all those tucks and pleats!
I'd assumed it was the tie created that puffy neckline.
And then there are the wonderfully clear and concise instructions...
 
 
This was not the sort of project I was looking for at all. It's not that I didn't think it achievable, it's that I wanted something which wasn't going to be taxing on the ol' grey matter. Or my shoulder.
 
After taking several deep breaths to calm myself down (calm blue oceans, calm blue oceans), I pulled some floral print, stretch satin out of the stash and got to work. Ignoring the confusing instructions, I started with the pleats at the top of the neckline, only to discover I couldn't make darts - the lower neckline was now all bunched up. Out came the unpicker; this was not a good start.
 
 
Creating the structure for the Chou was a little fiddly, but once I worked out the order in which they needed to be sewn, it was actually pretty easy. It's amazing what a bit of patience can achieve.
 
 
The interfacing I've used might be a little heavy - I didn't take into account it would be doubled over when folded inside - but I'm still pleased with how the neckline sits.


We've finally had some sunshine here so I've managed to get outside and get some pics of my finished blouse in all it's puffy-necked glory. Lovely!


Every single one of those button holes down the back are bound - the pattern called for it so  I had to. I did consider just making an everyday button hole, but it felt like I'd be cheating somehow, especially after I'd worked so hard on getting the collar right. Damn you, Tam, & your perfectionist ways!
 
Squinty!
 
 
Oh, soul-warming sunshine,
I do hope you're here to stay!
 
 
- Tamara

Tuesday, 7 August 2012

Choc-Mint Delight

With no outings planned and Mdblm working on Saturday evening, I've managed to get quite a bit of sewing done this weekend. I worked on a couple of annoying UFOs and the 40s blouse that has been testing my patience is now finally finished. Phew!

Butterick 2941

"The bow neck blouse is as feminine as a sigh. We call your attention to the interesting slanting yoke line in front and the placement of the buttons."

This pretty blouse has been demanding to be made for nearly two years now, but despite having found the perfect fabric, I've not been confident enough to get started. Just look at all that gathering and the bow neck was going to be tricky. With all my dreaming of floaty blouses back in June, I decided it was high time to give it a go.

As predicted, the bow neck was confusing but the rest of the blouse was relatively simple; I just took my time and made sure I read the instructions. That said, I did have quite a bit of trouble deciphering this step:

Attaching bow tie yoke to blouse & facing pieces.

In the end, I called in Mdblm to cast his eye over the nonsensical diagram and see if he could work it out. After a fair bit of um-ing and twisting of my fabric, he put a pin in it and said "I think that's how it's meant to go." He was right, clever boy! It sits a bit funny at the neckline but I can't see any way of fixing it, so it will just have to stay as is.


It's been blowin' a gale here today so it was lots of fun trying to get a good photo of the bow. Here I am trying to hold it in place until the wind dies down. It didn't really work.


Note the interesting, slanting yoke line in the front and the placement of the buttons.


I love the double button design but think it may need another set to keep the opening sitting flat. You can also see how the bow is actually attached to the shoulder seam, not the neck opening.


See what I mean about the folded tie bit at the collar bone sitting oddly?
Perhaps I should tack it down? Any suggestions?


And here's my lovely, flat slashed sleeve opening. I'm so pleased with myself; no longer will I fear the slashed opening! Oh, and just look at how well the buttons match! They're a brown and teal tortoiseshell and although they kinda blend in with the fabric, I think they are perfect.


Outfit complete!

- Tamara

Thursday, 26 July 2012

Merrily We Roll Along

My 1940s blouse is really beginning to test my patience. I've probably got at least an hours hand sewing left to do, some of which is of my own choosing.

Although I've overlocked all the seams, I needed a tidy way to finish off the ties so I decided it was high time I gave the rolled hem a go. It's a technique I've seen many other sewers use and it creates a lovely, professional looking finish, but I've always been afraid to give it a go. Turns out, my fears were completely unfounded.


First, I folded the edges up roughly 1/8th of an inch, then folded it again and pinned it to make the nice, flat edge you can see above.


The next step is to lower the needle into the fabric, lower the foot and sew a couple of stitches to anchor the thread. Keeping the needle through the fabric, lift the foot and insert the folded portion into the curl of the hemmer foot. Lower the foot and sew, lifting the edge of the fabric to keep it feeding smoothly and evenly. Too easy!

I was so pleased with myself, I went crazy and sewed a rolled hem on all the visible edges. Unfortunately, I didn't take into account how much fabric was going into the hem and it ended up eating up most of the fluffiness out of my bow.


The pattern envelope suggests the bow should be 'as feminine as a sigh', mine now looked more like a wheeze. The lovely, puffy bow was the main thing that drew me to this blouse, that and the unusual slanted yoke, and now it was too thin. Time to do some unpicking.

This project hasn't been all bad though, I've managed to conquer another sewing technique during the process. I've always hated having to use the 'slash' method to make back neck or sleeve openings, simply because I could never get it nice and flat. Not so anymore...


The problem was, once I had sewn the reinforcing V-shape and cut down into it, I wasn't cutting far enough. I was so afraid of cutting right through the end and ruining it that I stopped short. This time, I found myself a small pair of embroidery scissors and snipped right down into the point, leaving only a couple of threads intact. I then folded the facing piece inside, and would you look at that? It worked!!


 Huzzah!! That's two new sewing skills to add to my repertoire.
Now, back to my hand stitching...

- Tamara


Wednesday, 11 July 2012

Judgement Day

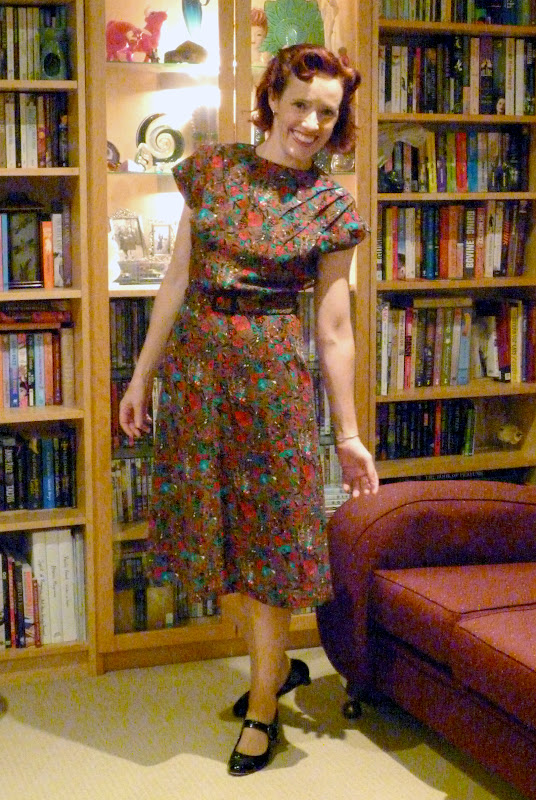
After all my new acquisitions last week, I'm proud to announce I have used two pieces of fabric from my stash in the last few weeks. You may recall the 'Ugly or Awesome' dress from a couple of weeks ago - the 1940s Vogue pattern to made from a crazy, vintage style fabric I'd been sitting on for a few years? Well, it's done and I still love it!

Here's a quick refresher of my pattern - Vogue 6044.


This 1940s dress has every thing I love about Vogue patterns - A simple design; clean, classic lines; and just look at the stylish darts at the shoulders. Wonderful!


Very few alterations were needed and I barely glanced at the instructions, it was that easy. That said, I am a full bust size smaller than my pattern and although I made allowances for the difference when I cut it out, there was still quite a lot loose fabric under the arms. No problem, I just took in the side seams of the bodice and cut off the excess.


Notice how the darts are nice and flat in the first pic and then in the above they're all wavy? I can't quite work out what happened there. I think I may have stretched the fabric while I was sewing the darts. I did unpick a couple and resew them but it didn't make much of a difference. I figure I can always tack them down if they bother me that much.


I made a bit of mess of the first button hole, - they're bound and I had to it three times before I got it right - I think that's why it sticks out a little at the top. A little press-stud should fix that.


As you can see, I'm pretty pleased with the result; Mdblm still hates the fabric.
What do you think? Is it ugly or awesome?

- Tamara
Related Posts Plugin for WordPress, Blogger...